Hugo [1]是一个用 go 语言编写的开源[2]网站构建框架,截止目前 GitHub 星数超过70k,它具有功能强大的模板系统、丰富的主题、完善的文档以及全平台支持的客户端,提供开箱即用的分类系统、评论系统、代码高亮、多语言支持等功能,非常适合用来搭建博客网站。
在本地撰写阶段,借助 Hugo 内置服务器可以做到毫秒级热更新,实现所见即所得。同时,得益于 Hugo 采用静态站点生成[3]的架构,Hugo 站点可以很容易的部署到各种 HTTP 服务器,且通过本地预览即可确认线上部署效果。
基于成本和使用习惯考虑,选择使用 GitHub Pages 进行部署,并且根据功能不同进行仓库拆分。话不多说,来开始吧。
环境安装
Hugo 分为标准和扩展两个版本,扩展版支持 WebP 图像处理以及 Dart Sass,这里我们选择安装扩展版本。
参考官方安装指南[4],前置准备需要安装 Git、Go 和 Dart Sass [5],mac系统可直接使用 homebrew 进行安装,我的电脑上 Git 和 Go 已经安装好,只需要安装 Dart Sass:
1
2
3
4
5
6
7
| # 添加 tap 源
$ brew tap sass/sass
# 安装 Dart Sass
$ brew install sass/sass/sass
# 验证
$ sass --version
1.69.5
|
安装 Hugo:
1
2
3
4
5
| # Hugo 安装
$ brew install hugo
# 验证
$ hugo version
hugo v0.120.4-f11bca5fec2ebb3a02727fb2a5cfb08da96fd9df+extended darwin/arm64 BuildDate=2023-11-08T11:18:07Z VendorInfo=brew
|
可以看到 hugo 版本信息中包含 +extended 信息,说明安装的是 Hugo 扩展版。
博客创建
从 Hugo 主题站[6]挑选自己喜欢的主题,大多数主题都有 demo 可以体验,我选的是 FixIt。
GitHub 仓库准备
接下来创建三个 GitHub 仓库:
- GitHub Pages 仓库:仓库名前缀必须使用用户名,格式为<username>.github.io,必须为公开仓库,用于博客部署。
- 博客仓库:可随意命名如 myblog,私有仓库,用于存储博客源代码,包括文章和配置。
- 主题仓库:从 FixIt 源代码库[7] fork,用于自定义配置主题,另外我 fork 过来后将默认分支从 master 重命名成了 main。
三个仓库的关系如图所示:
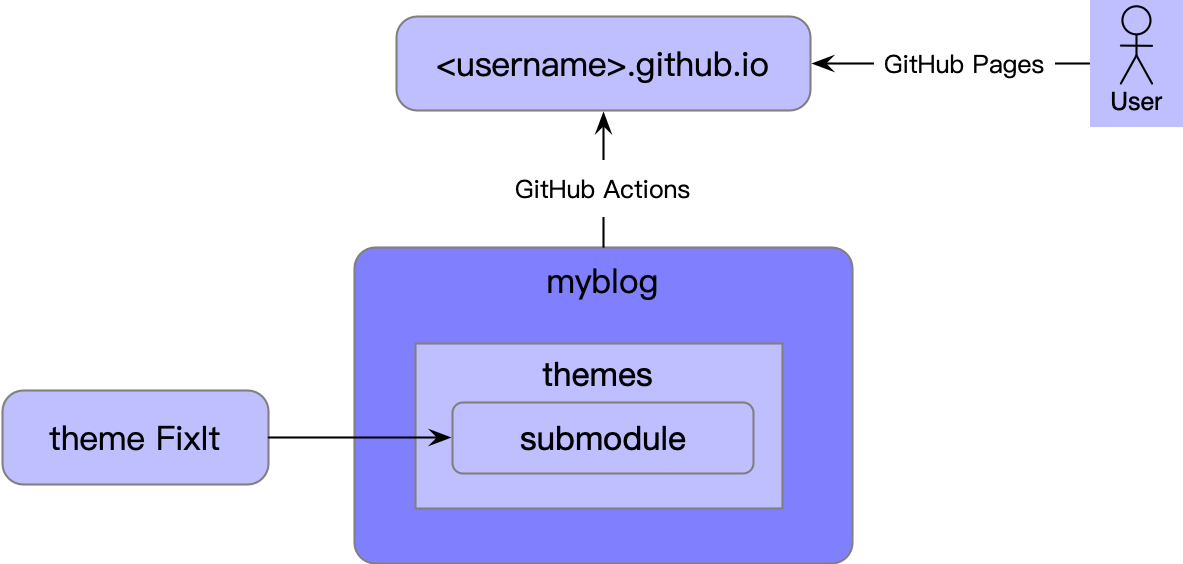
博客仓库将主题以 submodule 的形式导入到 themes 文件夹,通过配置文件指定使用的主题;当博客仓库的代码提交到 main 分支时,会触发 GitHub Actions 将 Hugo 构建好的静态站点文件部署到 GitHub Pages 仓库,用户即可通过 GitHub Pages 域名进行博客访问。
三个仓库中,只有 GitHub pages 仓库是必须的,如果不在意博客内容和源代码隐私性,可以去掉 myblog 仓库,将博客源代码存储到 <username>.github.io 仓库中,GitHub Pages 支持使用特定分支(默认是 gh-pages)部署。如果不准备自定义修改主题,可以去掉 FixIt 仓库,直接使用官方源代码仓库或者通过 Hugo module 进行主题安装。
博客站点创建
仓库准备好之后,可以通过 Hugo 命令行工具[8]快速创建站点,Hugo 默认使用 toml 格式配置,同时支持 yaml 和 json,我的博客使用 yaml:
 1
 2
 3
 4
 5
 6
 7
 8
 9
10
11
12
13
14
15
16
17
18
19
20
21
22
23
24
| $ hugo new site --format yaml myblog
# 切换到博客仓库目录
$ cd myblog
# 初始化 git 仓库
$ git init
$ git add .
$ git commit -m "feat: init hugo site"
# 绑定远程博客仓库
$ git remote add origin git@github.com:will4j/myblog.git
$ git push -u origin main
# 增加主题子模块
# 这里因为 fork 主题仓库跟博客仓库在同一目录下,采用相对路径引入
$ git submodule add ../FixIt.git themes/FixIt
# 设置主题
$ echo "theme: FixIt" >> hugo.yaml
$ cat hugo.yaml
baseURL: https://example.org/
languageCode: en-us
title: My New Hugo Site
theme: FixIt
|
Hugo 默认的站点目录结构[9]如下:
- archetypes:原型目录,用于定义各种类型的内容模板。原型匹配顺序是优先本站点内,其次再到主题内查找。
- assets:资产目录,用于放置 CSS,JavaScript 等全局资源库。
- config:配置文件目录,主配置文件 hugo.yaml,支持多文件配置、多环境配置[10]。
- content:内容目录,用于放置文章、分类、标签等内容页面。
- data:数据目录,用于存取自定义配置数据。
- i18n:国际化目录,用于页面文本的多语言翻译。
- layouts:布局目录,用于放置 html 模板。
- public:部署目录,用于存放 Hugo 构建的静态站点文件。
- resources:资源目录,包含 Hugo 资产构建流水线产生的可缓存文件,如 CSS、图片等。
- static:静态资源目录,该目录下的文件会被直接拷贝到站点根目录。
- themes:主题目录,包含 Hugo 站点可以使用的主题。
可通过 Hugo mounts 配置[11]自定义站点目录结构。
文章创建及预览
Hugo 支持 Page bundles [12]模式,即文章内容打包在一个文件夹下,内部可以独立包含图片、子页面等静态资源,文章以 index.md 作为入口,可基于 FixIt 主题提供的 post-bundle 原型进行自定义修改:
 1
 2
 3
 4
 5
 6
 7
 8
 9
10
11
12
13
14
15
16
17
18
19
20
| # 拷贝主题原型到站点目录
$ cp -r themes/FixIt/archetypes/post-bundle archetypes
# 增加博客图片目录,最终结构如下,注意空目录在原型使用时不会生效
$ tree -a archetypes/post-bundle
archetypes/post-bundle
├── images
│ └── .gitkeep
└── index.md
# 创建 Page bundles 文章
$ hugo new content --kind post-bundle posts/hello-world
# 文章目录结构
$ tree -a content/posts/hello-world
content/posts/hello-world
├── images
│ └── .gitkeep
└── index.md
# 添加 markdown 内容
$ echo "\n## Hello World" >> content/posts/hello-world/index.md
|
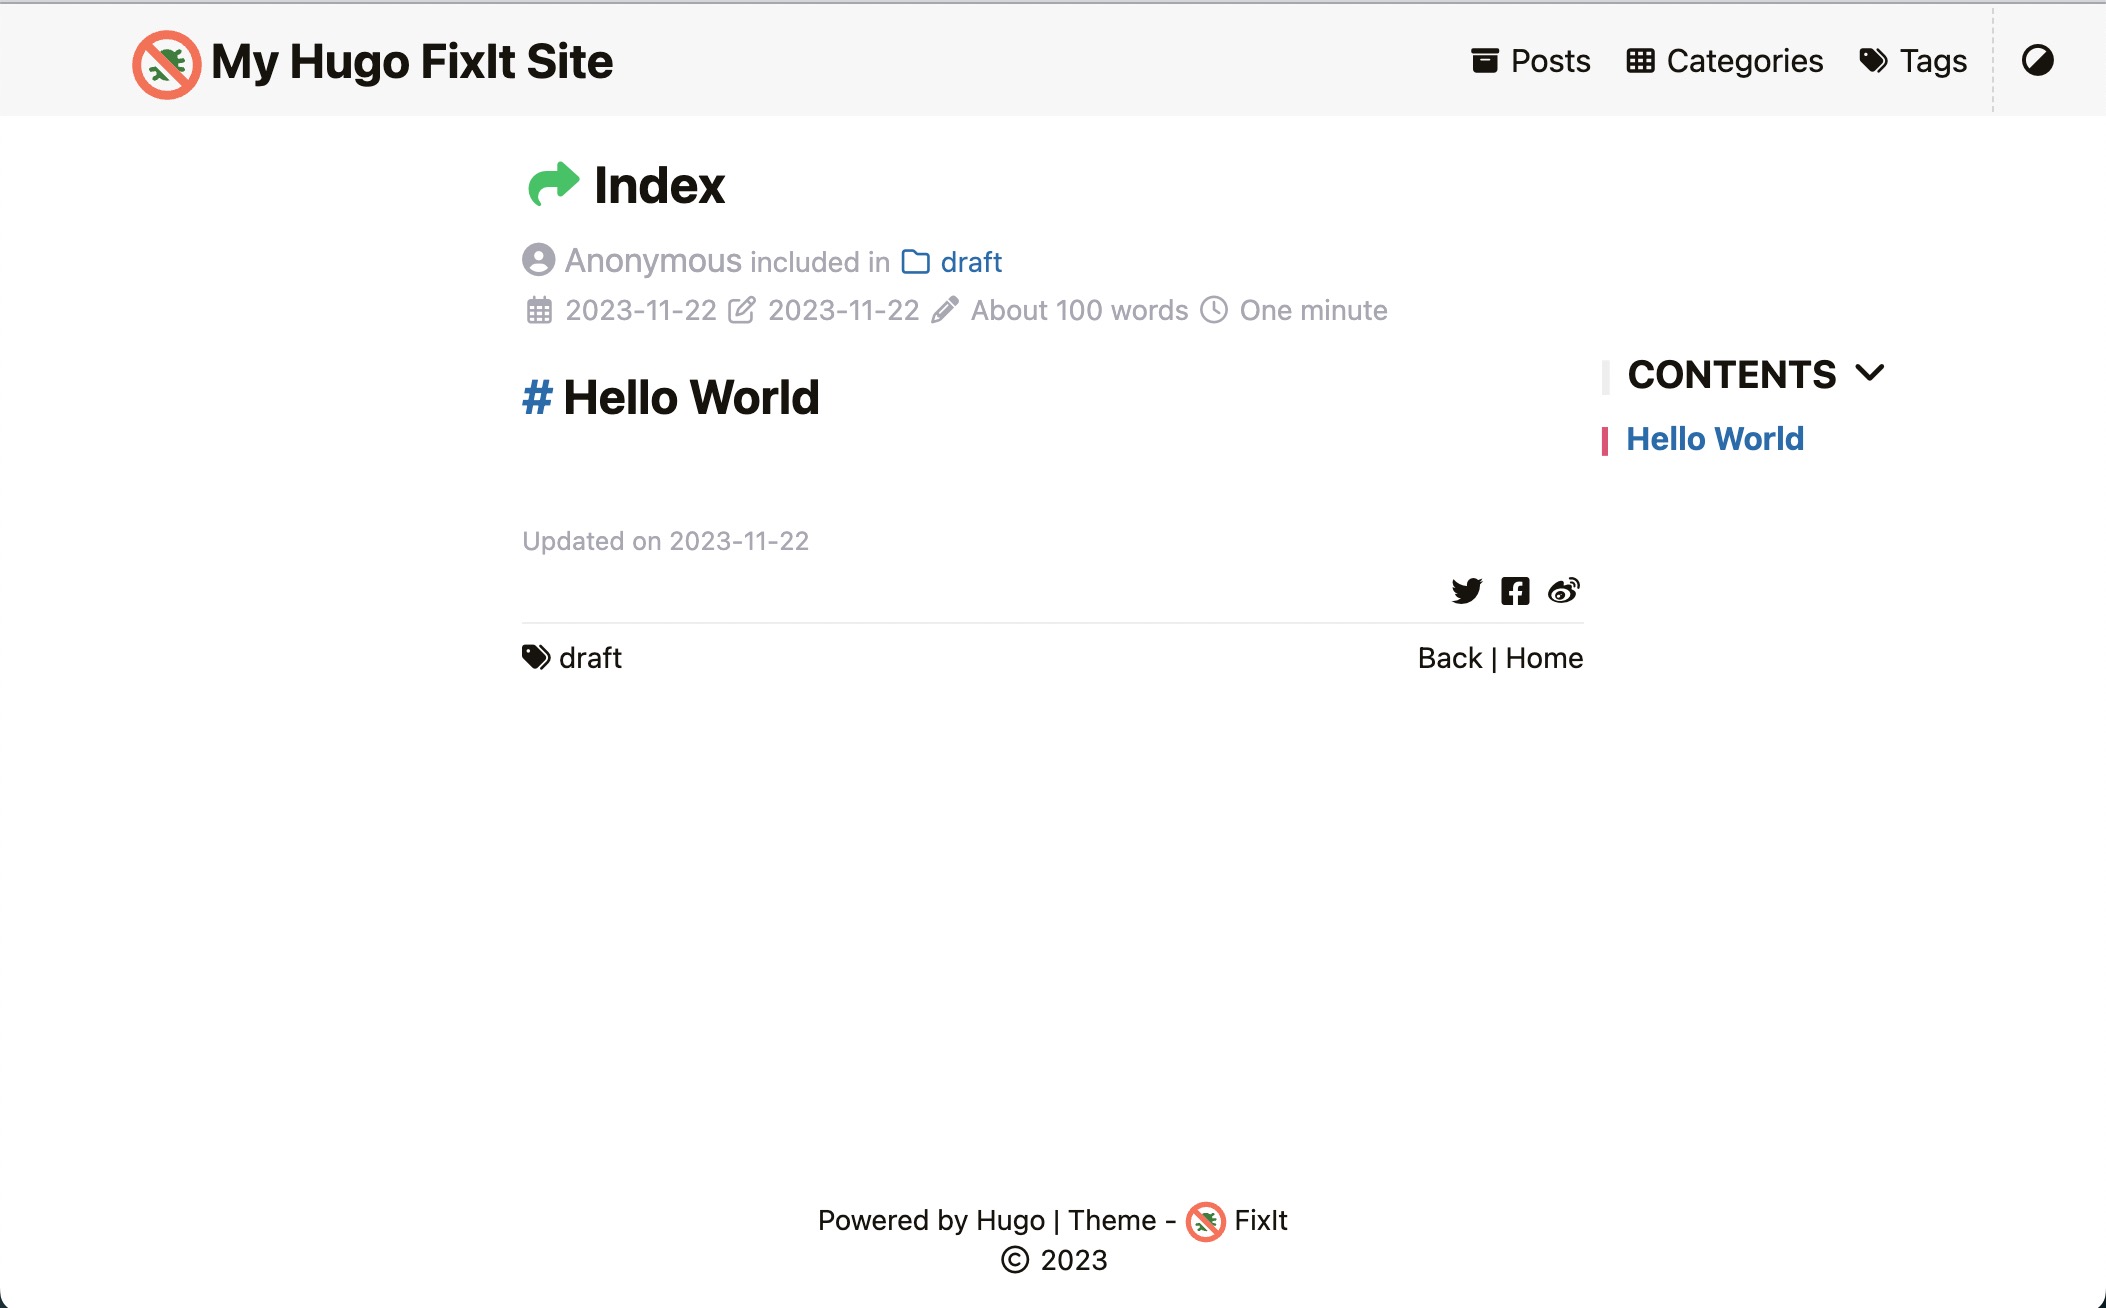
上面的命令已经成功配置主题并创建了一篇文章,现在可以通过hugo server --buildDrafts命令启动本地预览服务,访问启动信息中显示的地址,如http://localhost:1313,进入首页,点击文章即可预览博客:
查看文章 index.md,其内容分为两部分:前置页[13]和文章主体。前置页用于配置文章元数据,如标题、分类、标签等显示设置以及评论是否开启等控制开关,文章主体是 markdown 内容。下面是一段前置页示例,yaml 格式前置页由---包裹:
 1
 2
 3
 4
 5
 6
 7
 8
 9
10
11
12
13
14
| # content/posts/hello-world/index.md
---
# 文章标题
title: Index
# 文章创建时间
date: 2023-11-22T06:51:28+08:00
# 是否草稿
draft: true
# 标签和分类
tags:
- draft
categories:
- draft
---
|
前置页除了 Hugo 预定义的标签外,也支持用户自定义标签,比如 FixIt 主题就定义了很多自定义前置页标签[14]。
至此,博客站点的基本框架就搭起来了。
博客配置
通过 Hugo 和 FixIt 主题配置来调整博客显示布局,配置文件目录如下:
 1
 2
 3
 4
 5
 6
 7
 8
 9
10
11
| $ tree -a config/_default
config/_default
├── author.yaml # 作者信息配置
├── hugo.yaml # Hugo 主配置
├── languages.yaml # 多语言配置
├── menus.yaml # 菜单配置,菜单也支持多语言,当前只配置中文
├── module.yaml # 模块、目录挂载配置等
├── outputs.yaml # 输出格式配置
├── params.yaml # 额外参数配置,主题配置主要在这个文件
├── permalinks.yaml # 站点路径映射
└── sitemap.yaml # 站点地图配置,主要用于 seo 优化
|
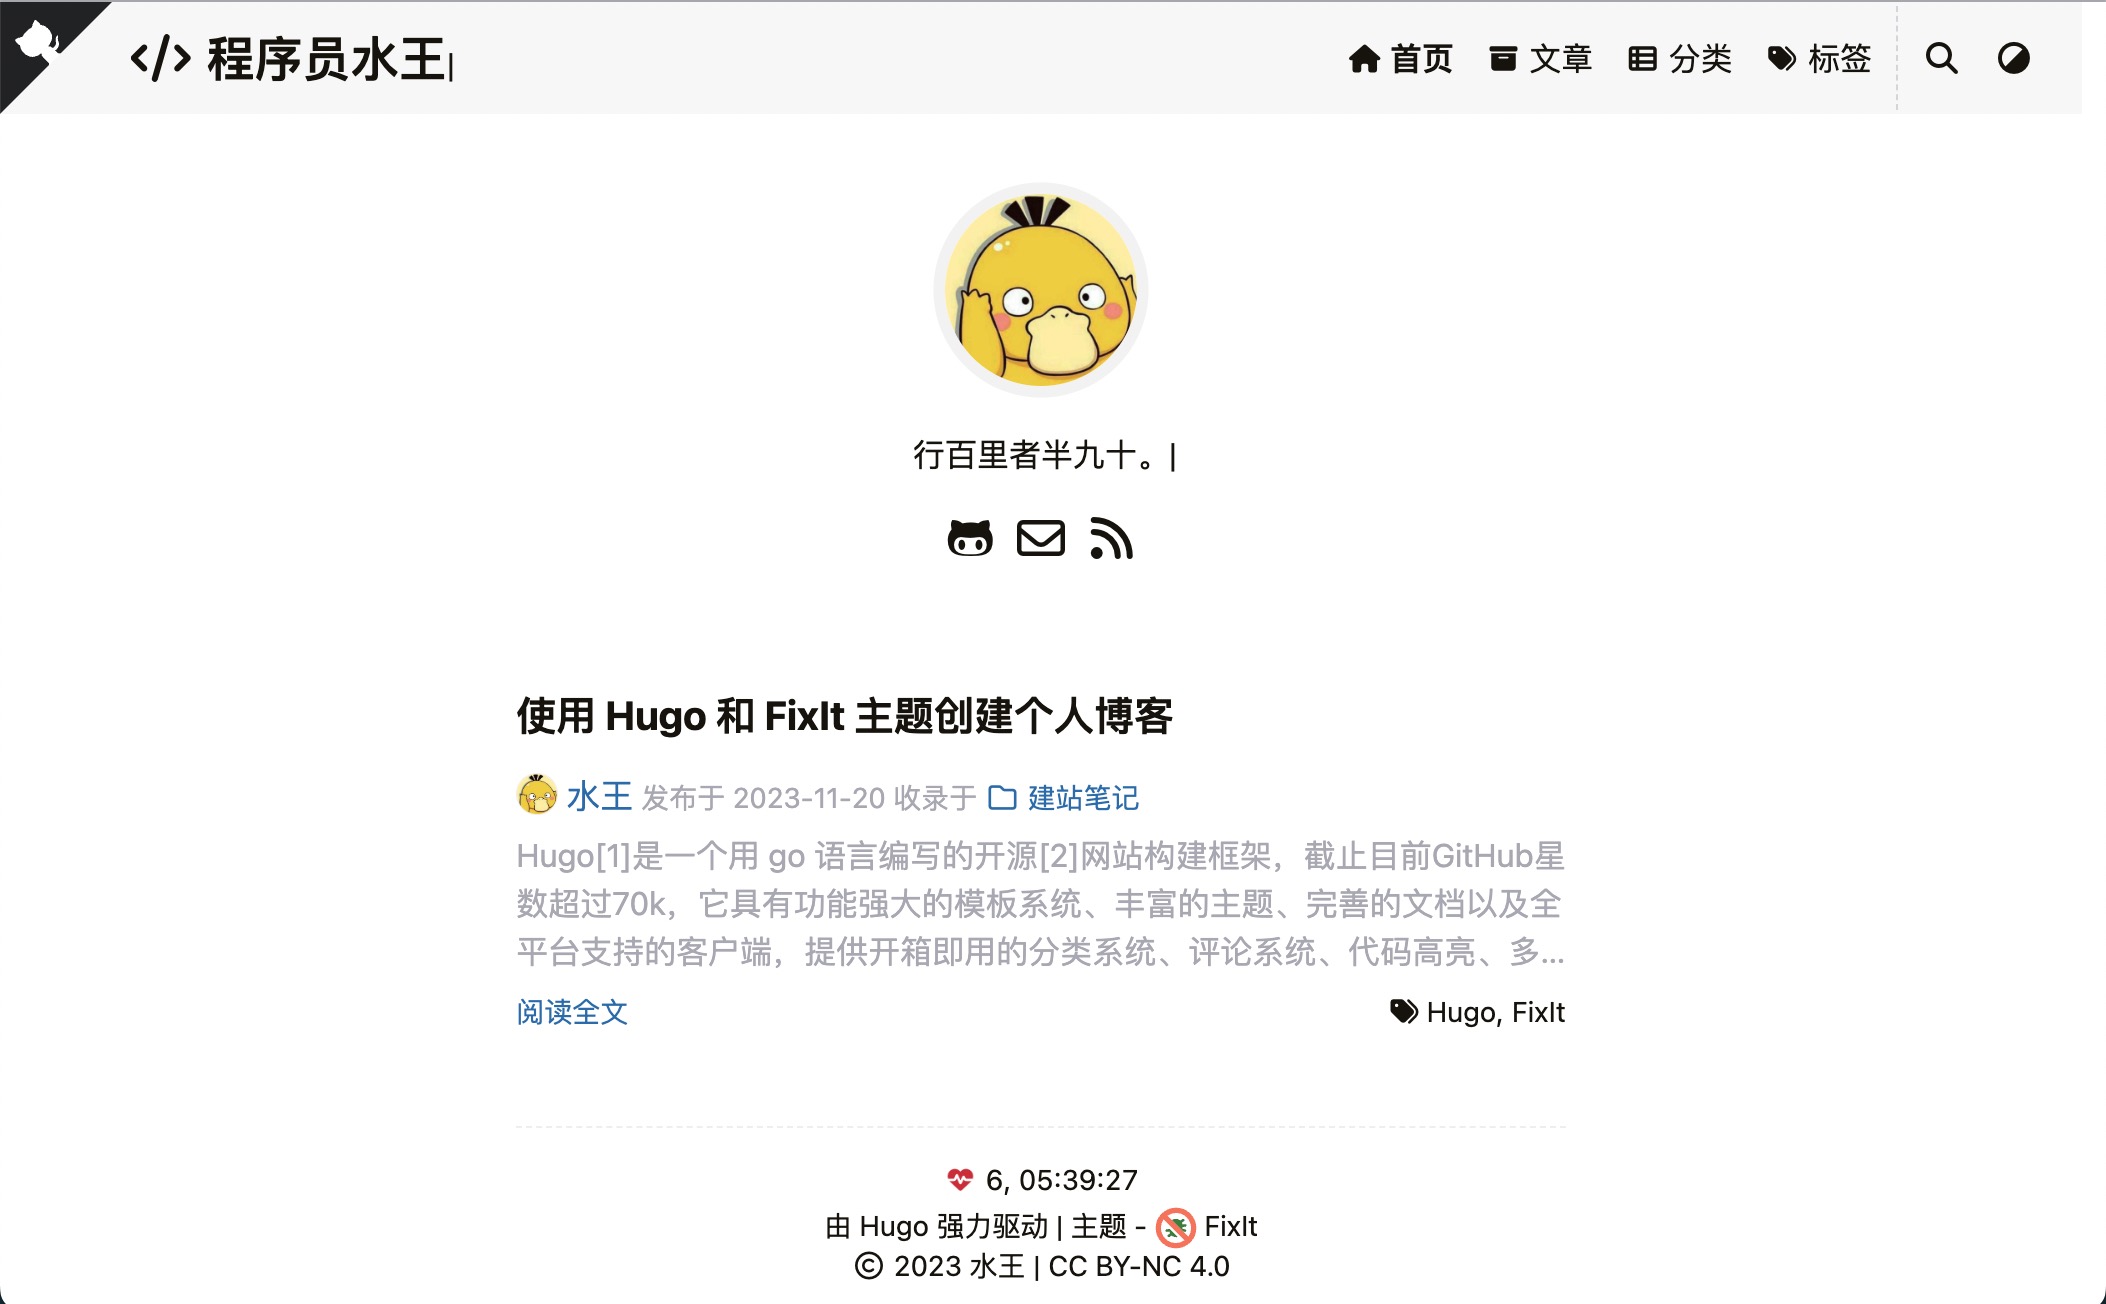
配置文件来源于 Hugo 定义变量[15] 和 FixIt 主题定义变量[16]。最终展示效果如下:
顶部菜单
创建首页、文章、分类和标签四个菜单,调整中文命名。FixIt 主题支持 FontAwesome 图标[17],可以根据个人喜好挑选。
 1
 2
 3
 4
 5
 6
 7
 8
 9
10
11
12
13
14
15
16
17
18
19
20
21
22
23
24
25
26
27
28
29
30
31
32
| # config/_default/menus.yaml
---
# https://gohugo.io/content-management/menus
# https://gohugo.io/content-management/multilingual/#menus
# https://fixit.lruihao.cn/documentation/basics/#menu-configuration
# https://fontawesome.com/icons
main:
- identifier: home
name: 首页
url: /
weight: 1
params:
icon: fa-solid fa-home
- identifier: posts
name: 文章
url: /posts/
weight: 2
params:
draft: false
icon: fa-solid fa-archive
- identifier: categories
name: 分类
url: /categories/
weight: 3
params:
icon: fa-solid fa-th-list
- identifier: tags
name: 标签
url: /tags/
weight: 4
params:
icon: fa-solid fa-tags
|
搜索支持
FixIt 主题支持 Lunr.js、algolia 和 Fuse.js 三种搜索方式。
前置条件需要增加 json 输出格式,以生成搜索依赖的 index.json:
 1
 2
 3
 4
 5
 6
 7
 8
 9
10
11
| # config/_default/outputs.yaml
---
# https://gohugo.io/templates/output-formats/#customizing-output-formats
# https://gohugo.io/templates/output-formats/#output-format-definitions
home:
- html
- rss
- json
page:
- html
- markdown
|
配置使用 Fuse.js 搜索,忽略大小写:
1
2
3
4
5
6
7
8
9
| # config/_default/params.yaml
---
# https://fixit.lruihao.cn/documentation/basics/#search-configuration
search:
enable: true
type: fuse
fuse:
# https://fusejs.io/api/options.html
isCaseSensitive: false
|
博客标题
修改默认顶部标题,去除 logo,使用 fa 图标,增加打字特效:
1
2
3
4
5
6
7
8
| # config/_default/params.yaml
---
header:
title:
logo: ""
name: Programmer William Wang
pre: <i class="fa fa-code"> </i>
typeit: true
|
在标题左边增加 GitHub 角:
1
2
3
4
5
6
7
| # config/_default/params.yaml
---
githubCorner:
enable: true
permalink: "https://github.com/will4j"
title: "Visit Me on GitHub"
position: left
|
首页资料
在首页展示个人头像和联系方式:
 1
 2
 3
 4
 5
 6
 7
 8
 9
10
11
12
13
| # config/_default/params.yaml
---
home:
profile:
enable: true
subtitle: The last leg of a journey just marks the halfway point.
avatarMenu: github
avatarURL: /img/avatar.png
social:
GitHub: will4j
Email: williamw0825@gmail.com
RSS: true
|
中文语言
在主配置文件中定义站点默认语言:
1
2
3
4
5
6
| # config/_default/hugo.yaml
---
# Content without language indicator will default to this language.
defaultContentLanguage: zh-cn
languageCode: en
defaultContentLanguageInSubdir: false
|
通过多语言配置文件单独配置中文:
 1
 2
 3
 4
 5
 6
 7
 8
 9
10
11
12
13
14
15
16
17
18
19
20
21
22
| # config/_default/languages.yaml
---
# https://gohugo.io/content-management/multilingual/#configure-languages
zh-cn:
# 这里大小写很重要,定义网站 html lang
languageCode: zh-CN
languageName: 简体中文
# If true, auto-detect Chinese/Japanese/Korean Languages in the content.
# This will make .Summary and .WordCount behave correctly for CJK languages.
hasCJKLanguage: true
title: 程序员水王
params:
description: 程序员水王的个人博客
home:
profile:
subtitle: 行百里者半九十。
header:
title:
name: 程序员水王
app:
title: 程序员水王
|
作者信息
配置文章作者的名称、头像等信息:
1
2
3
4
5
6
| # config/_default/author.yaml
---
name: 水王
email: williamw0825@gmail.com
link: https://github.com/will4j
avatar: img/avatar.png
|
头像图片放置到 assets 目录下:
1
2
3
4
| $ tree -a assets
assets
└── img
└── avatar.png
|
分类别名
在 categories 目录下创建分类名称文件夹及对应 _index.md:
1
2
3
4
5
| $ tree -a content/categories
content/categories
├── _index.md
└── blog-build
└── _index.md
|
1
2
3
4
5
| # content/categories/_index.md
---
slug: "categories"
title: "分类"
---
|
1
2
3
4
5
6
| # content/categories/blog-build/_index.md
---
slug: "blog-build"
title: "建站笔记"
description: "博客建站过程记录"
---
|
页脚配置
页脚增加站点运行时长统计、开源证书配置等:
 1
 2
 3
 4
 5
 6
 7
 8
 9
10
11
12
13
14
15
16
| # config/_default/params.yaml
---
footer:
enable: true
since: 2023
hugo: true
siteTime:
enable: true
value: "2023-11-16T07:40:29+08:00"
visitor:
enable: false
license: '<a rel="license external nofollow noopener noreferrer" href="https://creativecommons.org/licenses/by-nc/4.0/" target="_blank">CC BY-NC 4.0</a>'
order:
powered: 1
copyright: last
statistics: first
|
其中,修改 FixIt 主题,增加了footer.visitor.enable参数,用于在开启不蒜子时隐藏全站访问量统计:
1
2
3
| # themes/FixIt/layouts/partials/footer.html
-- {{- if eq .Site.Params.ibruce.enable true -}}
++ {{- if .Site.Params.ibruce.enable | and .Site.Params.footer.visitor.enable -}}
|
阅读数统计
开启不蒜子访问统计:
1
2
3
4
5
6
| # config/_default/params.yaml
---
# Busuanzi count
ibruce:
enable: true
enablePost: true
|
CDN 加速
使用 jsdelivr 对 css、js 库的静态资源进行 cdn 加速:
1
2
3
4
5
| # config/_default/params.yaml
---
# https://fixit.lruihao.cn/documentation/basics/#cdn-configuration
cdn:
data: jsdelivr.yml
|
博客部署
部署密钥配置
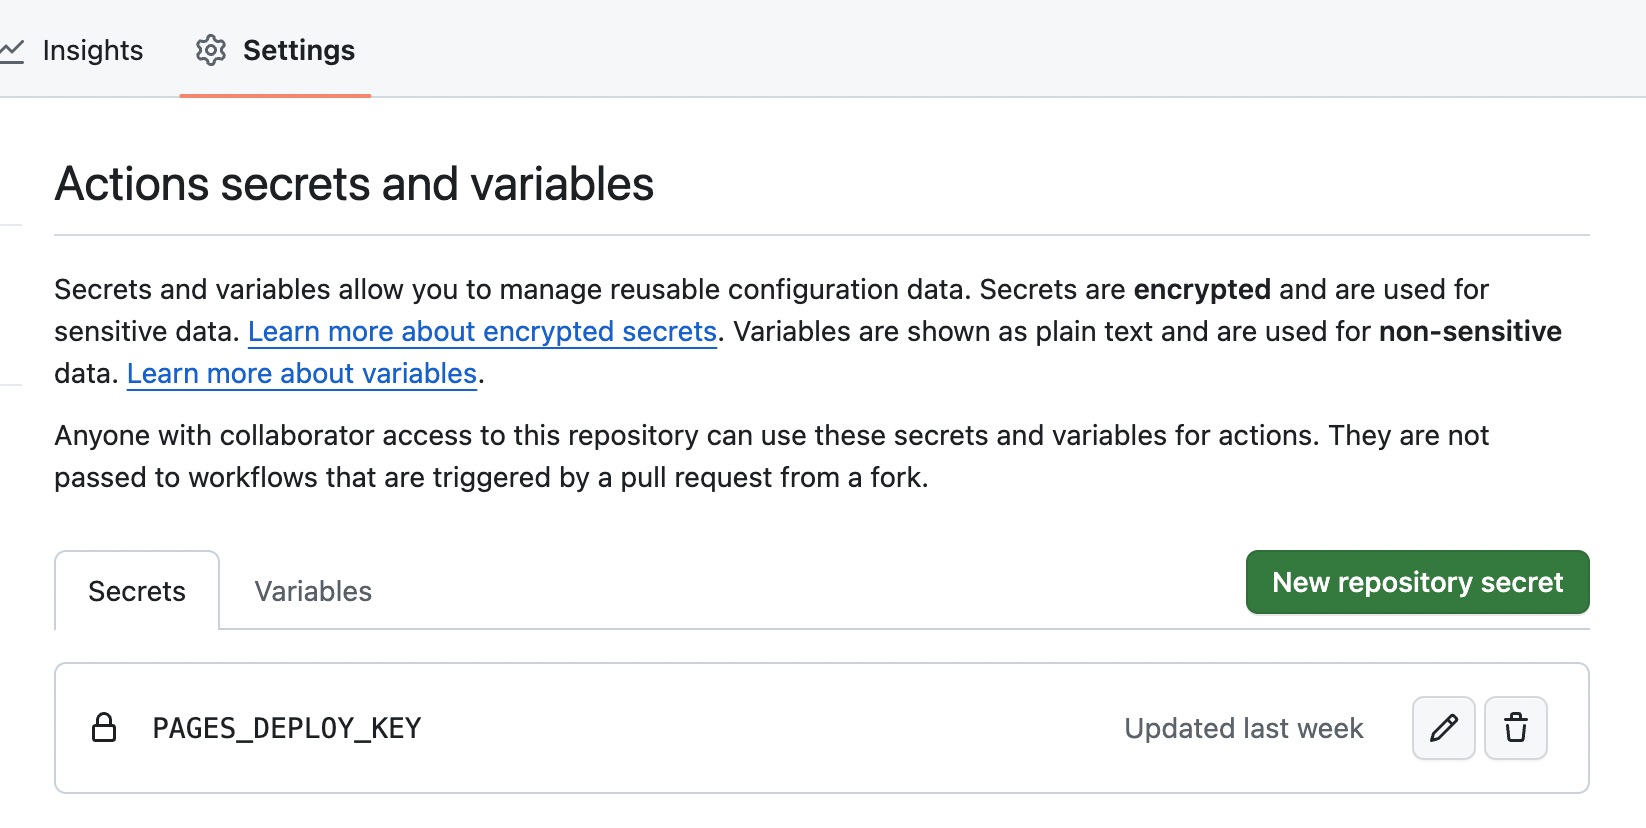
首先需要配置部署密钥[18],在 GitHub Pages 仓库添加公钥,并允许写入权限:
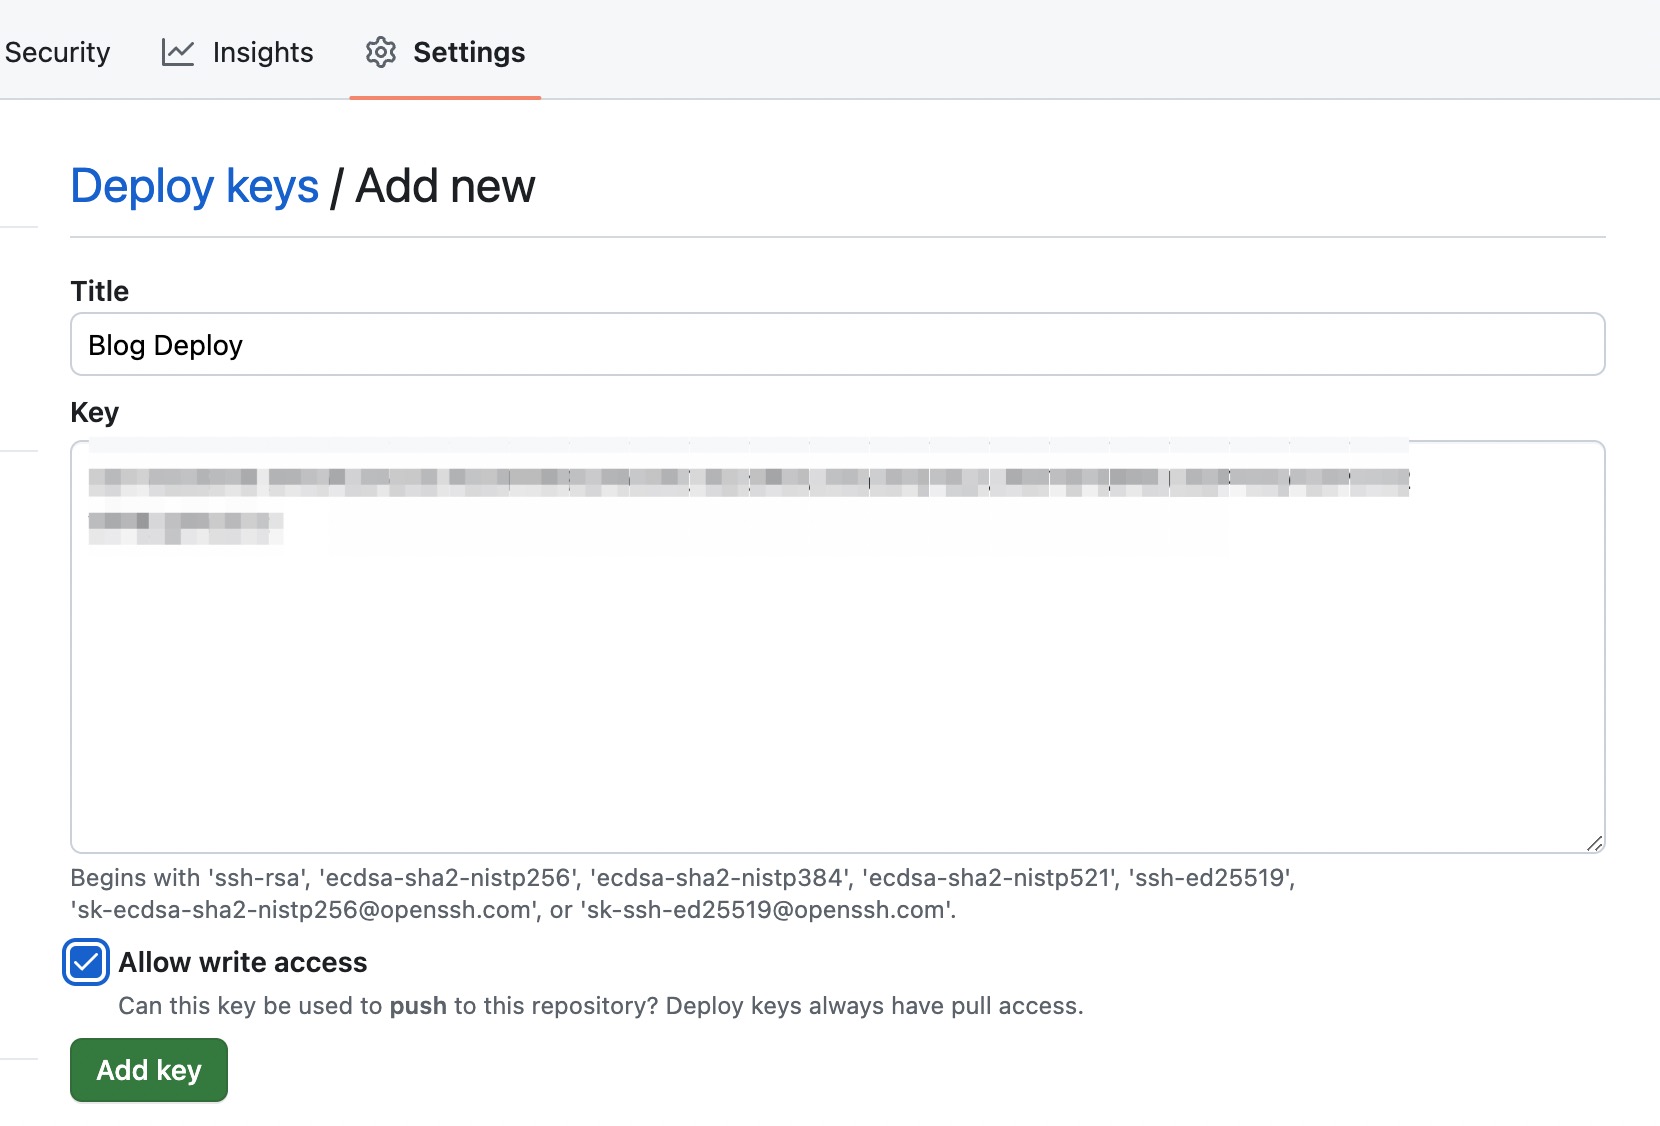
在博客仓库 Actions 密钥中添加 GitHub Pages 仓库部署私钥:
GitHub Action 配置
在博客仓库增加 Workflows 配置文件[19]:
 1
 2
 3
 4
 5
 6
 7
 8
 9
10
11
12
13
14
15
16
17
18
19
20
21
22
23
24
25
26
27
28
29
30
31
32
33
34
35
36
37
38
39
40
41
42
43
44
45
46
47
48
49
50
51
52
53
54
55
56
57
58
59
60
61
62
63
64
65
| # .github/workflows/deploy-to-github-pages.yaml
---
# https://github.com/actions/starter-workflows/blob/main/pages/hugo.yml
name: Deploy to Github Pages
on:
push:
branches: [ main ]
# Allows you to run this workflow manually from the Actions tab
workflow_dispatch:
# Sets permissions of the GITHUB_TOKEN to allow deployment to GitHub Pages
permissions:
contents: read
metadata: read
packages: read
jobs:
build:
runs-on: ubuntu-22.04
concurrency:
group: ${{ github.workflow }}-${{ github.ref }}
env:
HUGO_VERSION: 0.120.4
steps:
- name: Install Dart Sass
run: sudo snap install dart-sass
- name: Setup Go
uses: actions/setup-go@v4
with:
go-version: "^1.21.4"
- run: go version
- name: Setup Hugo
uses: peaceiris/actions-hugo@v2
with:
hugo-version: ${{ env.HUGO_VERSION }}
extended: true
- name: Checkout Source Code
uses: actions/checkout@v4
with:
submodules: recursive
fetch-depth: 0
- name: Build with Hugo
env:
# For maximum backward compatibility with Hugo modules
HUGO_ENVIRONMENT: production
HUGO_ENV: production
run: hugo --minify --gc
- name: Deploy 🚀
uses: peaceiris/actions-gh-pages@v3
# https://github.com/peaceiris/actions-gh-pages
with:
deploy_key: ${{ secrets.PAGES_DEPLOY_KEY }}
external_repository: will4j/will4j.github.io
publish_dir: ./public
publish_branch: main
user_name: 'github-actions[bot]'
user_email: 'github-actions[bot]@users.noreply.github.com'
full_commit_message: ${{ github.event.head_commit.message }}
|
总结
通过使用 Hugo 和 FixIt 主题创建博客站点,大量减少了网站搭建需要做的重复工作,同时 Hugo 也具备灵活扩展的能力,给用户提供了极大的自定义空间。
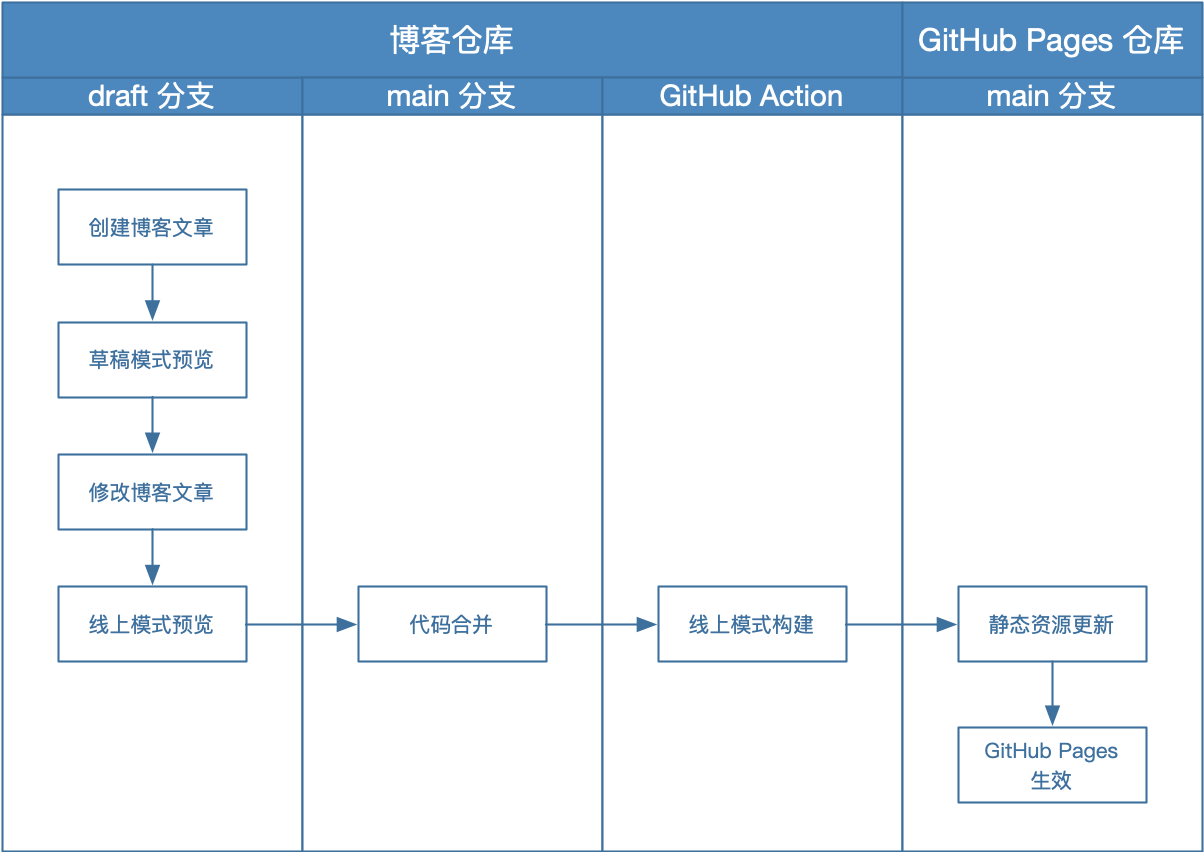
GitHub 工作流的引入,使作者可以专注于博客写作本身,本地预览后提交代码即可触发博客更新发布,整体工作流程如下:
参考资料
[1]. Hugo 官方文档:What is Hugo
[2]. GitHub: Hugo 源代码仓库
[3]. Hugo 官方文档:Benefits of static site generators
[4]. Hugo 官方文档:Installation
[5]. Hugo 官方文档:Transpile Sass to CSS
[6]. Hugo 官方文档:Hugo 主题站
[7]. GitHub: FixIt 源代码仓库
[8]. Hugo 官方文档:Hugo 命令行工具
[9]. Hugo 官方文档:Hugo 目录结构
[10]. Hugo 官方文档:Hugo 配置文件目录
[11]. Hugo 官方文档:Hugo 目录挂载
[12]. Hugo 官方文档:Page bundles
[13]. Hugo 官方文档:前置页
[14]. FixIt 官方文档:前置页配置
[15]. Hugo 官方文档:Hugo 定义变量列表
[16]. FixIt 官方文档:主题配置
[17]. FontAwesome 图标
[18]. GitHub 文档:设置部署密钥
[19]. Hugo 官方文档:通过 GitHub Pages 部署